

As a part of our continued efforts to provide technical guidance for our clients, a request was made recently as to whether or not we could provide a highly secure, multifactor authentication methodology for remote VPN users. Obviously, there are many choices available, but we found only one that had the scalability necessary to start off small and cost effective, and ultimately scale to hundreds if not thousands of users.
The article below has been written to demonstrate the authentication features of the Fortinet security appliance suite, specifically their flagship product, the FortiGate firewall. I wanted to show a real-life example of how we could provide secure multifactor VPN without having to break the bank. The example below is designed to show this configuration in the most basic sense, using only the features that come with a standard FortiGate appliance. Fortinet provides an included two licenses of FortiToken (Two-Factor Auth) per FortiGate as a way of allowing administrators to experience the power and simplicity of this feature. Today, we’ll be using these included ‘FortiTokens’ to setup our VPN.
It’s important to note that Fortinet allows for their FortiToken functionality to scale well above and beyond what we’ll be looking at today. They even have a dedicated appliance that is specifically designed for authentication offload called the FortiAuthenticator, but we’ll get into that in another article. For now, we’ll stick with the FortiGate and a typical AD authentication setup.

Speaking of authentication, we’ll be leveraging a very commonly used authentication methodology, i.e. RADIUS. RADIUS has been around for many years and has evolved ever so slightly during its iterations within Windows. Now a part of the NPS feature set, we’ll be showing how to configure RADIUS on a Windows Server 2016 box, as this is the most recent and secure.
Below is a quick and dirty diagram of what we’ll be setting up:
The goal of this configuration will be to:
- Setup a Windows 2016 RADIUS server for FortiGate authentication
- Setup a FortiGate firewall to authenticate to a Windows 2016 RADIUS server
- Setup the necessary users and groups
- Configure FortiToken Two-Factor Authentication
- Configure FortiToken Push Services
- Setup SSL VPN to use RADIUS and Two-Factor enabled accounts
- Setup FortiClient VPN
Part 1: Install and configure RADIUS on Windows Server 2016
Logon to the Windows 2016 server that you plan to use as your RADIUS server. This server does not have to be standalone and can be installed on Domain Controller. Launch Server Manager and select ‘Manage’ from the top right. Select ‘Add Roles and Features’ to launch the wizard. From the wizard page, select ‘Network Policy and Access Services’ as shown below.

Click ‘Next’ and ‘Finish’ to start the installation. This install should not require a reboot.

Once the installation is complete, from the Server Manager, select ‘Tools’ and then select the new “Network Policy Server’ option.

Right Click on RADIUS Clients and select ‘New’. This will bring up the new RADIUS client dialog. Configure the page with the following:
- Check the “Enable the RADIUS client’ checkbox
- Give your RADIUS server a friendly name (ex. RADIUS)
- Enter the IP address of the LAN interface of your FortiGate. This is typically the default gateway for the internal network.
- Leave the radio box checked with ‘Manual’
- Enter a Shared Secret password (write this down for future use)
- Click OK

Once the RADIUS client is configured, Select ‘Connection Request Policies’ under the Policies section of the NPS Snap-in.

- Right Click and Select ‘New’
- On the Overview Tab, Give the Policy a Name like ‘FortiGate VPN’
- Select the ‘Policy enabled’ check box
- Leave the Type of network access server to ‘Unspecified’
Next, select the ‘Conditions’ tab
- Click the ‘Add’ button and then select the condition call NAS IPv4 Address.
- Click the ‘Add’ button again and type in the IP address of the FortiGate’s internal LAN address.

Next, select the ‘Settings’ tab
- Click on ‘Vendor Specific’ and select the ‘Add’ button.
- Scroll to the very bottom of the list and select ‘Vendor-Specific’
- Click the ‘Add’ button again

Select the ‘Add’ button for the 3rd time and you will see the screen below. Select ‘Enter Vendor Code’ and enter the value 12356.

Click OK when finished.
At this point you should see your attribute as shown below.

Click OK to save this setting.
Click OK once more in the bottom right to close the Connection Request Policy box.
You should see your policy listed as shown below.

Lastly, we need to configure a Network Policy.
Select ‘Network Policies’ from the Network Policy Server Snap-in.

- Right click, and select ‘New’.
- Give the policy a friendly name (i.e. VPN Policy)
- On the Overview tab, make sure the ‘Policy enabled’ checkbox is checked
- Verify that ‘Grant access’ is selected
- Verify that ‘Type of network access server’ is set to Unspecified
Select the ‘Conditions’ tab
- From the Conditions tab, select ‘Add’
- Select ‘Windows Groups’, then select Add
- Select ‘Add Groups’
- Type in the name of the group in AD that you want to allow for VPN authentication*
- Click ‘Check Names’ and make sure your group resolves correctly.
- Click OK, then OK.

*If you do not have a security group created in AD for VPN users, you need to stop and create one before proceeding.
Once you have added the AD Group condition, go to the ‘Constraints’ tab.
Verify that the following boxes are checked, then click ‘Apply’ then ‘OK’ to complete the policy.

This should conclude the necessary steps to configure RADIUS on Windows Server 2016. Next, we need to configure the FortiGate firewall.
Part 2: Configuring RADIUS, MFA and SSL VPN on the FortiGate Firewall
Logon to your FortiGate device and navigate to the RADIUS server settings menu under User & Device. Select ‘Create New’ from the top menu.

Give your RADIUS server a name (can match Windows server name for easy identifiability). Add the following settings:
- Select Specify for Authentication method and chose MS-CHAP-v2
- Enter the IP address of your RADIUS server under NAS IP
- Select “Include in every user group”
- Under Primary Server enter the IP of the RADIUS server again
- Under Secret enter the secret password you configured in RADIUS client settings
Once the configuration settings are in place you can select the ‘Test Connectivity’ button. You should get a green response saying that connectivity is successful.
*NOTE: the ‘Test User Credentials’ button will not work, no matter how you configure your settings as this is only designed to function with the insecure PAP security protocol. Since we have configured our system to use MS-CHAP-v2, you will always receive a failure message is you attempt to use this button.
In order to complete a successful user test, we’ll need to run a command from the command line.
FortiGate# diagnose test authserver radius RADIUSSERVERNAME mschap2 username password
Below is a successful output of this command:
*NOTE: The account you test with must be a member of the VPN Users group that we created and configured in the Windows RADIUS server.
Once the RADIUS settings are in place and verified, we need to create a user group.
- Select ‘User Groups’ under User & Device, and select ‘Create New’.
- Give the Group a name and select ‘Firewall’ as the type.
- Click ‘OK’ to create the group.
Once the group is created, we need to create some users and add them to the group.
- Select ‘User Definition’ from beneath User & Device
- Select ‘Create New’
- Select ‘Remote RADIUS User’
- Click ‘Next’
- Type in the user name you wish to use (ex. elsimpso) You do not need to include the domain prefix.
- Use the drop-down menu to select the RADIUS server we created earlier.
- Click ‘Next’
Here is where we can enable Two-Factor Authentication for this account. To enable it complete the following steps:
- DO NOT ENTER AN EMAIL ADDRESS!
- Select the ‘SMS’ box.
- Select the Country Code and enter the phone number for the FortiToken mobile client you wish to use
- Select ‘Two-factor Authentication’
- Use the drop-down menu to select a FortiToken to assign to this user.
- Click ‘Next’
At this point there should be a message stating that a code has been sent to the user’s device. The user will need to use this code to configure FortiToken Mobile so that they can then use this device for MFA.
If for whatever reason this code does not appear, you can access this code via the command line. See the screenshot below:

Use the code found next to ‘activation-code’ to setup your FortiToken mobile app. It is important to remember to give the app the EXACT user name you configured in the FortiGate. (i.e. elsimpso in our example)
Back to our user creation. On the last tab, ‘Extra Info’, select the ‘User Group’ button and add in the group we created earlier as shown below.

Once completed, you should have an account that looks like the one shown below. Note the type is RADIUS and there is a Two-factor code.

Now that we have our RADIUS settings and user account created (you can obviously create as many user accounts as needed) its time setup the SSL VPN.
Start off by navigating to the SSL-VPN Portals menu under the VPN section of your FortiGate.
You notice that there are three pre-created SSL VPN tunnels. For our example, we will be setting up the traditional full-access VPN.
Select ‘full-access’ and select the ‘Edit button above.
Configure the settings for your VPN as shown below.
*Note: Some settings, such as the Theme are obviously optional. The important things here are enabling Tunnel Mode with Split tunneling and making sure that there is a resource pool of IP addresses for clients to use.
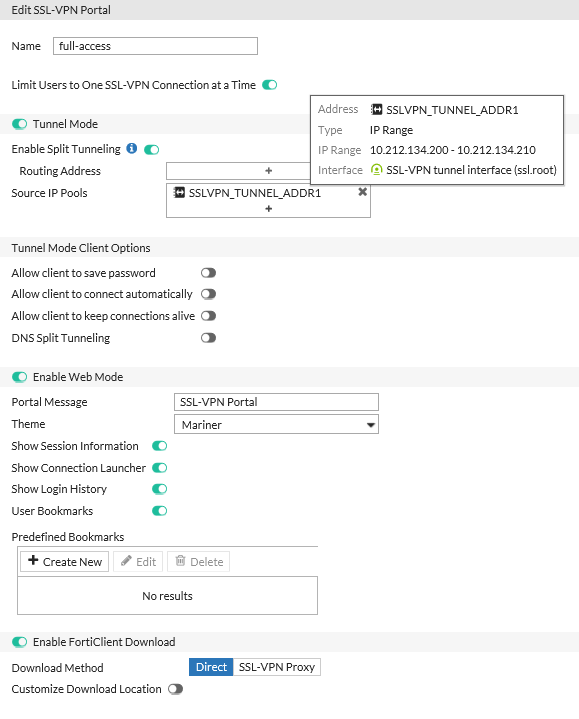
Click ‘OK’ to finish the settings.
Once the SSL VPN Portal is ready, go to the SSL-VPN Settings menu. Here we really only need to verify a few things. Specifically, make sure that you select a port other than 443, as we’ll typically use this for other services. In my example, I chose 10443.
- Make sure that ‘Require Client Certificate’ is off.
- Make sure that the full-access portal is listed under the Authentication/Portal Mapping section.

Once you’ve completed this, use a web browser to try and access your SSL VPN Portal. You should see something like this:

OK so now we’re almost done. Since we’ve enabled two-factor authentication, we also want to enable FortiToken Mobile Push.
So, what is FTM Push? In a nutshell, instead of having to manually type in your 6-digit MFA code every time you connect to the VPN, you can simply configure the FortiGate to ‘push’ an authorization request to your FortiToken Mobile device.
To enable FTM Push we have to make two quick changes:
Open the command line on the FortiGate and type the following:
- config system ftm-push
- set server-ip x.x.x.x (use your public IP configured on your WAN interface)
- set status enable
- end
Once this is done, we’ll enable FTM Push on the WAN interface. The easiest way to do this is via the GUI. Simply open Network à Interfaces and select your WAN interface.
- Click ‘Edit’ to configure the WAN interface.
- Under the ‘Administrative Access’ section, select FTM.

Once this is done, you’ll be able to use the FTM Push feature when logging into to the VPN with MFA.
Ok, the final steps at this point is to configure a FortiClient VPN client. This is an extra step and not necessary as SSL VPN can function within the browser only, but I always prefer to have a client configured.
To do this, simply launch the FortiClient from a PC with it installed.
Select the ‘Remote Access’ tab
Click the Configure VPN link

Configure the VPN settings as shown:

Note that we’ve selected ‘Customize port’ and changed the port to 10443. You can use either a Public IP or a Public hostname for the Remote Gateway.
Click Save.
Now we’re ready to connect.
- Type in the username and password for an AD account that you’ve setup earlier.
- Click the Connect button
- You may get a warning about the certificate. This occurs if you do not have a valid Public CA cert attached to your FortiGate. This is not a requirement, and you can simply click YES to allow the connection. This should only happen the first time you connect.
At this point you should see the screen below. Here you can either manually enter the 6-digit code from your FortiToken Mobile device, or you can select FTM Push.

FTM Push is supported with both Apple and Android devices, so the way the push notification is displayed may vary a bit. Ultimately, you’ll want to look at the notifications menu on your phone and you’ll see a FortiToken Mobile notification. Below is an Apple notification:

Simply select ‘Approve’ and in a few moments you should be connected to the VPN.
So, to wrap this up, in this article we’ve:
- Setup a Windows Server 2016 to support a RADIUS client connection from a FortiGate firewall
- Configured a FortiGate firewall to connect to a Windows RADIUS server
- Configured a VPN User Group
- Added a remote RADIUS user to the VPN User Group
- Configure remote RADIUS user with Two-Factor Authentication via FortiToken Mobile
- Configured FortiToken Mobile Push
- Configured SSL-VPN
- Configured FortiClient fabric agent to connect to SSL VPN
- Completed successful two-factor authentication with RADIUS